Quick tip: Symbolic links in Windows

It’s already 12:28 AM. I really need to make this quick, though I’m not really sleepy.

Symbolic links as I see it, is merely a shortcut to a certain directory that you point out. The only difference is that its not actually just pointing out to another directory. Just like when you create a shortcut in windows.

Because when you click on a shortcut, it leads you to the directory which you specified when you created the shortcut.

Here’s an example. We are in drive c, the animeMusic folder is a symbolic link. While the dls is a shortcut. Examine what happens with the address on the next screenshot

image

You will see here that if I click on the folder dls. I will be brought to the actual directory that I specified in the shortcut.

image

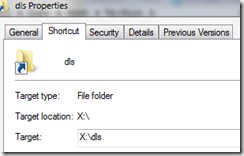
Examine the shortcut properties:

image

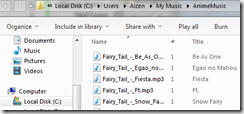
This time I click on the folder animemusic. See what happens to the address:

image

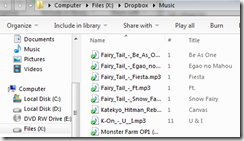
The actual location of that folder is in a different drive:

image

This is great because now we can either refer to the symbolic link or the original directory if we need to.

We can use this on our web development projects when linking files:

require_once(‘c:symboliclinksomefile.php’);

Might be easier than typing the whole path in case the path that you are linking looks something like this:

d:extrasuperduperlongheavyweightfolderpathfilename.php

Well that’s a little bit exaggerated on my part but I think you get what I’m talking about here.


How?

Yeah, I almost forgot that I still haven’t showed you how, and this quick tip really gets longer and longer as I spout more useless words.

To create a symlink, just open up your command line and follow this general format:

mklink D  NEW_PATH BASE_PATH

D is a parameter for the mklink command which tells that a symbolic link directory must be created.

NEW_PATH is an unexisting path.

BASE_PATH is the path that you want to link to your newly created path.

Here’s an example:

mklink D C:UsersAizenMusicAnimeMusic  X:DropboxMusic

Yeah, that’s pretty much the command that I used to create the AnimeMusic symbolic link above.

Searching for a specific filetype in Windows 7

This is yet another very short tutorial on the search function of Windows 7. When looking for a specific file type. Common sense will tell us that you have to type something like ‘.ppt’ on the search bar to search for a powerpoint presentation file. That is accepted by Windows 7. But you won’t always get relevant results. Especially if you have files on that directory, which has ‘ppt’ on the filename. The better way on doing this is to use the ‘type’ search filter. This will tell the search function to look only for the specific file type that you specified after the colon ‘:’. Here’s an example:

image

How to install XP with Windows 7/Vista pre-installed

I have just installed Windows XP on top of Windows 7. So I’m gonna tell you how to do it while its still fresh on my mind.

It took me about 3 hours to do this because its actually the first time I have done this. So I hope this guide will help you cut down the time that I have spent on it.


Requirements:

Easy BCD 

Windows XP SP2/SP3 installation CD

Windows 7 installation CD

Common Sense


Backing up the MBR

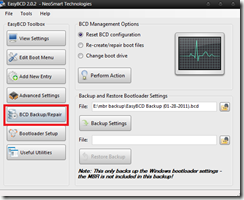
First thing that you need to do is to download and install Easy BCD. Then backup your Master Boot Record.

image

Back it up into an external location. Maybe a flash drive or an external hard drive. Just in case something will go wrong.

Just click on backup settings after you have selected the external location. Then check in the actual directory if there is a .bcd file in there. If there is none, then you have to click the backup settings button again until you will find the backup file in the location that you specified.


Partition hard drive

Next thing that you’ll need to do is to partition you hard drive. So that Windows XP will have a place to be installed.

To do that just right-click on Computer and select manage. Then select the disk management section:

image

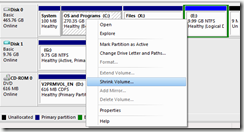
If you no partitions on your drive. Then you will need to shrink the partition where your current operating system is installed. Right-click on that partition and select shrink volume:

image

You’ll see something like this, but just wait since it may take a while depending on the size of your hard disk and how much files are stored in it.

image

Change the partition size  to your desired size. In this example it will be 10 Gb or 10240 Mb:

image

You can put whatever you want as long as its not above the largest size that is possible to shrink. Click on Shrink after you have inputted the desired shrink size.

Just leave the newly created unallocated space. But remember the size that you have inputted since we will make it as a basis when we install Windows XP.

Right click on the drive and select properties if you have forgotten its size. You’ll just have to convert the number indicated in there using an online converter. Because its expressed in bytes. What we need is the value in Kilobytes and Megabytes.

image


Installing XP

Restart your system. And go to your BIOS by pressing on f2 or del on your keyboard. Here’s a list of bios suppliers and the keyboard commands that you can use to access it:

http://michaelstevenstech.com/bios_manufacturer.htm

While you’re in the BIOS just change the SATA Mode to IDE. Because AHCI is somehow not compatible with Windows XP. Here are some supplements:

http://www.techarp.com/showfreebog.aspx?lang=0&bogno=313

http://www.techmetica.com/howto/sata-ahci-mode-bios-setting.-what-does-it-do/

This step is the most important since you will be getting a Blue Screen of Death or BSOD if you don’t change the SATA Mode into IDE.

Set your BIOS so that it will boot from the CD-ROM or DVD-ROM first. If you don’t know how to do that then visit this link:

http://helpdeskgeek.com/how-to/change-boot-order-xp-vista/

Save changes and exit.

The Windows XP installation CD will boot and then it will prompt you to press any key to boot from CD. Just press any key in your keyboard if you see this prompt.

Just go through the usual installation process. Visit this link if you don’t know how to do the usual process of installing XP.

http://www.buildeasypc.com/sw/windows_xp.htm

My only reminder is that you have to select the drive partition that you created a while ago. So that you won’t messed things up.


Repairing Windows 7 MBR

What you’ll need to do now is to restore the Master Boot Record of Windows 7. You will have to use the installation of Windows 7 to do this.

Here’s a guide from Microsoft on how to repair the MBR:

http://support.microsoft.com/kb/927392

But what I did was to use the commands below in the built-in command line tool in Windows 7 installation CD:

bootrec/fixmbr
bootrec/fixboot

Those commands will restore the Master Boot Record.

And will enable you to see the boot loader for Windows 7 again.


Restoring Windows XP

All you have to do now is to add an entry for Windows XP on the boot loader. This is where Easy BCD comes in again. Just click on Add New Entry.

image

I’m using the current version of easy BCD. Version 2.02. The interface might be a little bit different if you’re using a different version.Just select Windows XP on the OS type drop-down list. And click on Add Entry

image

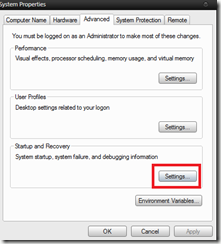
To check if it has indeed added Windows XP on the list. Just right-click Computer. Select properties. Advanced System Settings. Then click on Advanced tab. On the Startup and Recovery Section click on Settings

image

It has Microsoft Windows XP on the list.  Then just reboot your system. But if not then you’ll just have to repeat the process that you did on Easy BCD.

image

Always remember that you cannot boot Windows XP if your SATA Mode is AHCI. And you cannot boot Windows 7 if your SATA Mode is set to IDE. So you need to switch SATA Mode into AHCI if you need to boot to Windows 7. And IDE if you want to use Windows XP.


Conclusion

That’s it. There’s a challenge for you though. If you discovered how to boot XP or 7 without switching SATA Modes then please tell to me in the comments. Thanks!


How to install incompatible applications in windows 7

There are times when you have an application which you want to install. And then you get an error similar to this:

image

Saying that the application that you’re trying to install is not compatible with your current operating system. In this case, Windows 7.

A simple workaround on that is to run the installer in compatibility mode with the current OS.

To do that, just right-click on the installer and select properties.

Click on the Compatibility tab. And check the ‘run this program in compatibility mode for’. Then select the operating system indicated in the error.

image 

Click apply then click ok.

Launch the installer again. And you will now be able to install it on your system without having problems.

How to kill windows update

In this guide I will show you the ways on how to ultimately stop the windows update. There are many reasons why you would want to disable it:

  • It consumes bandwidth – people like us who has only about 50 kbps of download speed has barely enough bandwidth to even care about the windows update.
  • It is annoying – how many times did you see the popup on the lower right portion of the screen when windows update is enabled? It even prompts you to restart your computer once an update has been installed. And it never really stops not until you give up and restart the computer.
  • It consumes battery – this is true since every application that runs on the background consumes battery
  • It may sometimes cripple your system – there is once an update that I have installed in my machine. But it did something nasty because it made the enter key on my keyboard do something else other than what its made for. Every time I press the enter key the power options in the control panel shows up.

So here are the ways on how to kill it. You may use just one of them or use all of them. It would be better if you use all the methods since it may sometimes come back.


Control Panel

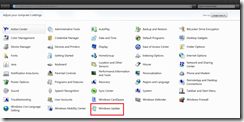
First, go to control panel then select windows update

image

Then select change settings.

image

Then just copy the settings which I have set here. Then press ok.

image


Msconfig

The second method is by using the built-in utility for windows called the msconfig. To run it, just search for msconfig on the windows 7 search box.

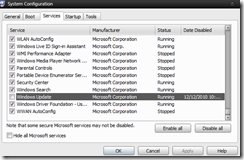
Click on the services tab then search for windows update. Uncheck it, click apply then ok. Then restart your system.

image

What we just did was to stop the windows update service from executing during system startup.


Services

The final method goes together with the second method so you might as well do the second method first before doing this.

What we will do here is to stop the windows update from running if it is still running even after disabling it from running during startup.

Just search services.msc on the windows 7 search box then execute it by either clicking on pressing enter on your keyboard.

Search for the windows update then click on the stop link located at the middle portion of the services.msc window.

image


Conclusion

That’s how you can kill the windows update service. But by doing this you wont receive anymore updates from microsoft.

Updates aren’t really necessary if you know your way when dealing with computers. Just stay safe  in the internet by following this guide. And you are fine without the security updates from microsoft.

How to stay safer on the internet

In this tutorial, I will show you the ways on how you can be safer while connecting to the internet. Whether you are connecting to the internet via an unsecured wi-fi hotspot or a wired connection, it doesn’t matter because the tips that I’m going to show you here is applicable for both connection types.


WOT

-Short for Web Of Trust. It is an add-on which can be installed on a browser. Its main role in life is to determine the authenticity and safeness of a website.

You can see the rate of a website by looking at the color of the WOT icon.

  • Red- Very poor
  • Orange –Poor
  • Yellow- Unsatisfactory
  • Light Green-Good
  • Green- Excellent

To download WOT, just go into their site:

http://www.mywot.com/en/download

And as you can see from this screenshot, it can be installed on the 5 major browsers:

  • Google Chrome
  • Internet Explorer
  • Mozilla Firefox
  • Safari
  • Opera

image


HOSTS File

You can also be safer by editing your hosts file. You can find the hosts file by navigating to:

c:windowssystem32driversetc

All you need to do now is to replace your original hosts file with this one:

Don’t worry it is safe, if you will examine the file carefully. You will find that most of the sites that are in there are advertisement sites like infinity ads. Which isn’t really that useful for us users, and those sites might even contain malicious code in them, so its better if we block our computer from being able to access it.

If you have other sites that you wish to block, like the time waster facebook.com. You can do so by adding this line at the end of your hosts file:

127.0.0.1 www.facebook.com

If you don’t know what 127.0.0.1 is, then it’s the localhost. Which means that you are blocking the site which is beside it, in this case facebook.com from the localhost or your computer itself.


ANTIVIRUS

This is already old, but still worth mentioning. Antivirus software is not mandatory if you use your common-sense while using your computer.

But still its good to have one installed on your computer to back you up in case you suddenly slipped into browsing a malicious site.

Free antivirus software will do, if I’m going to recommend you one, I’d pick the two below:

    • Avast Free – The interface is the main reason why I pick this. But the protection is also good.
    • MSE – Most of the people at howtogeek and lifehacker recommends this one. And I’m currently using it.


ANTIMALWARE/ANTISPYWARE

Definitely needed, tracking cookies and flash cookies exists everywhere in the internet. If you don’t want to have this cookies lurking on the insides of your operating system. Then you must use these two:

    • MBAM –Malware Bytes Anti Malware. This one is recommended by our school. It really has nice detection rates when it comes to spyware and other malwares.
    • SAS –Definitely SUPER. I use this one every time and it never fails in detecting different kinds of cookies and malware.


NOSCRIPT

If you want to be totally secured ,then you should use NoScript, an extension for firefox used for blocking javascript, java, flash and other web plugins. Of course this would mean a boring web experience, but this way you would be totally secured. You can also enable javascript, java, and flash for sites you consider safe.

Here’s the link to NoScript.


CUSTOMIZE BROWSER

You can also customize your browser so that it would disable javascript, images, flash, cookies, plugins, pop-ups while you are browsing. This is similar to installing NoScript. But without installing anything which would consume an additional amount memory on your system.

In Google Chrome, all you have to do is to click on the wrench icon on the upper right corner of the window and select options.

After that, go to the ‘under the hood’ tab. Under the ‘privacy’ section, click on the ‘content settings’. This is now easy, all you have to do now is customize the options and you’re good to go.

image


CONCLUSION

That is all I have to say about staying safe on the internet. The most important aspect of staying secured on the internet is still common sense. You can have the most expensive antivirus in the whole world but if you don’t apply your common sense while browsing then you’re still not secured.

How to use applications without installing them on hard drive

Yup, the title really sounds like awesome huh? But what I’m going to tell you is just a simple little trick that I have discovered while using the program called Sandboxie. Which I mainly use for executing browsers, explorer window, and programs in a safe-mode way. Meaning, isolated from the operating system. In other words, viruses, malware, and other nasty stuff couldn’t get in the operating system. Well, that’s only in my opinion. But I still believe in the power of Sandboxie after about 4 years of using it.

You can actually use Sandboxie in many different ways. And what I’m going to tell you in this article is how to use it to use application without actually installing them on your hard drive. Just installing it in the computer memory or RAM by using the virtualization power of Sandboxie.

  1. First thing that you need to do is of course to download sandboxie. If you don’t already have it.
  2. Install it. 
  3. Right click on ‘Computer’ then select ‘run sandboxed’.
  4. You’ll now have a sandboxed version of the windows explorer. Now you need to navigate on the file that you want to install. Then install it.
  5. Of course, there won’t be any start menu or desktop shortcuts that would be showing up on your ‘unsandboxed windows explorer’. So what you’ll need to do is to navigate to ‘Program Files’ using of course, the sandboxed explorer window.
  6. You can now execute the application, however, just ignore any prompt that Sandboxie will tell you which regards to recovering the files that you have just installed. But for example, you installed an archive extracting application like 7-zip or Pea zip. Then you used it to extract files, then you should recover those files, but only those files that you extracted. You should be able to recognize it by means of common sense.

Note: Not every application may work. I don’t have a list right now but I’m going to list every application that I have tried someday. Applications installed using this way may also be a little unresponsive but still better than installing them in a virtualbox especially if you’re low on system memory.

Conclusion

That’s how you can use Sandboxie to use applications without actually installing them on your hard drive.

How to apply visual styles on Windows 7 part 3

This is the third part of the 3 part series for customizing visual style in windows 7. In this tutorial, I will actually teach you how you can change the default visual style in windows 7.

Changing the visual style is just easy, especially when you already have experience in using computer and its basic functions and operations.

This tutorial will show you the universal way on how to change visual style, it means that most of the visual style that can be downloaded in Deviantart actually follows the same procedure. But there can be variations so its always nice to follow the included tutorial in the visual style that you want to apply

A summary on what were going to do here would be:

  1. Back up
  2. Download
  3. Patch
  4. Replace
  5. Reboot


Backup

First thing that we need to do is to backup every file that we are going to replace. First you need to make a system restore point. This is needed in case you messed something up, there would be a backup. And you can always roll back to that backup anytime. To make a restore point, just click on the start orb and input: ‘create restore point’. Click that one, then click ‘create’ on the new window that’s going to open:

image

Name your restore point to a descriptive name, then click ‘create’. Wait for a few minutes. Most probably 15 minutes is the maximum. But mine took only 5 minutes.

Now, you need to backup system files. Open up My Computer and navigate to:

C:windowssystem32

Type ‘explorerframe.dll’, ‘explorerframe.dll.mui’ , ‘imageres.dll’ and ‘shellstyle.dll’  on the search bar:

image

Just copy those 3 files using ctrl + c. Then paste it somewhere safe.

After that, you need to gain privileges to rename or modify the file in any way you want. We need to do this since the system is the current file owner. We need to make the current user, preferably the system administrator own the file so that you can modify or replace or rename it. There’s a long-cut way on how to do that, but since I’m in a hurry I’ll show you the easiest path. Just download the following files, and put them on the same folder:

takecontrol.exe

vistaapi.dll

Now, launch the ‘takecontrol.exe’ with administrator privileges. To do that, just right-click on the file, and click ‘run as administrator’.

If you’re worried, then here’s a screenshot. Its not going to do anything nasty in your system, it will just make you own the file that you need to replace:

image

Just click on ‘add’ then navigate to the files which I mentioned above. Just select them one by one, the click on the ‘take control’ button. And you’re done.


Download

Now, you need to download 2 files:

Universal theme patcher (32-bit)

Universal theme patcher (64-bit)

Visual style that you want or just search windows 7 themes at deviantart.com


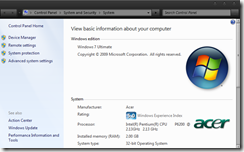
If you don’t know if you’re running 32-bit or 64-bit, then click on the ‘start orb’. Right click ‘my computer’ then select ‘properties’. You’ll see something like this, on the ‘system type’ section you’ll see what you are running, in my case, its 32-bit:
image

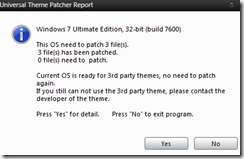
Launch the universal theme patcher which is applicable to your system, then you’ll see a dialog box. Just click on ‘yes’
image

In my case, the system is already patched so the patch button is already greyed out. And only the restore button is active:

image

Just click on those 3 patch buttons, then reboot and you’re good to go.


What you need to do now is to actually apply the visual style. After downloading the zip file from deviant art, extract it somewhere safe then navigate to the ‘themes’ folder. If you downloaded the ‘placebo’ visual style, it may look like this:

image

Copy all of those files into:

c:windowsresourcesthemes


Now, you need to rename the file that you have backed up  a while ago into something like:

explorerframe.dll.original

explorerframe.orginal

You get the idea, just rename it to whatever you like for as long as it doesn’t end with the .dll extension. If you don’t see the extension, then all you need to do is to press ‘alt’ on your keyboard, and on the menu that will show up, click on ‘tools’ then select ‘folder options’. Then switch to ‘view’ tab. Uncheck ‘hide extension for known file types’. Uncheck also the ‘hide protected operating system files’. Then check ‘show hidden files and folders’. That’s the bulletproof way of doing it, but for my system, the screenshot below is enough, only the ‘hide extension for known file types’ is unchecked.

image

Click apply and you are done.

Note: If you can’t rename the file, then you probably need to repeat the step wherein you take control over the file using ‘takecontrol.exe’


Now, navigate again into the visual style folder (the extracted version of the zip file you downloaded from Deviant art). Then go to the ‘system files’ or ‘system’ folder. There you will find some .dll files. In the case of placebo visual style, you will only find a ‘explorerframe.dll’ file.  Copy that one to:

c:windowssystem32

If you have ‘imageres.dll’ and ‘shellstyle.dll’ on your desired theme then you might as well replace the original files with those files that are found on the ‘system’ folder of your theme.

Reboot your system. Then right-click on your desktop, select ‘personalize’. Then choose the theme that you have installed.

image


If you want to replace the start orb which came with the visual style that you downloaded, then you must download the ‘start orb changer’

Just launch it with administrator privileges and select a .bmp file that you want to use.

You can download some start orb from deviantart. Here’s the link. Just search ‘windows 7 start orb’  on deviantart in case the link did not work.


Conclusion

That’s all, as I have said tweaking and customizing is just easy. You just have to know the basics of computer operations. This article has introduce you how to change the default windows 7 visual style. Please share this one on facebook or twitter, if ever you have one, thanksSmile

How to apply visual styles on Windows 7 part 2

This is the part 2 of the 3 part tutorial on how to apply custom visual styles on windows 7. In this tutorial I will show you the ways on how you can customize the visual style and themes in windows 7. And also the resources where you can download the files needed.


Rainmeter

I’m not a fan of  Rainmeter since it takes a lot of system resources like memory. I only got 2Gb of physical RAM on my computer so I do not really use Rainmeter. But if you’ve got more RAM on your computer, then you may try using it. But I’m not going to discuss it here since I don’t have any idea on how to use Rainmeter


Custom Visual Styles

This is the one that I’m going to discuss in the third part of this series. So if you want to skip then here’s the link to third part.

If you have seen part 1 of this series then you probably have seen the current visual style in my system. It is the Placebo visual style combined with 7 pro start orb which I found at Deviantart.com, my main source of visual styles.

If you want the placebo visual style, here’s the link. Just search placebo windows 7 in the deviantart in case the link doesn’t work.


Built-in Windows 7 theme customizer

There’s actually a built-in tool for windows 7 that allows you to customize the look of your system. But its not really enough when you really want your system to stand out and look unique from the others.

Just right-click on your desktop and choose personalize if you want to change the default windows 7 theme.

image


That’s it for the 2nd part, check out part 3 for the actual visual theme customization tutorial.