Yeah finally I got my hands dirty on Backbone.js and this time I’m also going to share to you what I’ve learned about backbone.js models.
Models in backbone.js is pretty much like the models in the MVC in server-side scripting language like PHP. If you aren’t familiar with the Models in the server-side they’re used for representing the data in the database. It’s a place where queries are being written. In simple terms data manipulation and retrieval happens in the Model.
But here were talking about the Models in the client-side particularly the Models used in Backbone.js. As I have said earlier they’re pretty much the same with the Models you used in the server-side in the sense that they also represent or store data temporarily.
If you want to learn the basics of Backbone.js before digging into this tutorial scroll all the way to the bottom and you will find some of the Backbone.js resources that I recommend.
Requirements
- jQuery – for dom manipulation and event delegation
- Underscore.js – hard dependency of Backbone.js
- Backbone.js – gives structure to JavaScript applications
Output
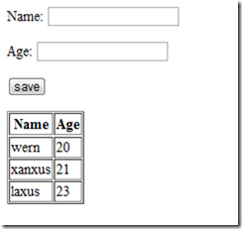
What we will be working on today is a very simple application that allows us to add people on a table. Feel free to put on some css if you want because this really looks very ugly without the styling.
Of course I’m only going to teach you how to use Models in Backbone.js in this tutorial as you might not know I’m also learning Backbone.js as I write this tutorial so this very simple application is going to evolve in simply making use of Models to using all the basic components of Backbone.js like the Views, Collections, and Routers at the end of this series of tutorials were also going to connect our application to Couch DB a NoSQL Database which uses JSON to store data.
Include
First you need to include the scripts that we need on the head portion.
<script src="jquery171.js"></script>
<script src="underscore.js"></script>
<script src="backbone.js"></script>
Note that jQuery isn’t actually required if you have other means of manipulating the DOM, another library that you might be using then use it instead of jQuery.
Markup
Next is the markup where we are going to input the name and the age of the person:
<p>
<label for="name">Name:</label>
<input type="text" id="name"/>
</p>

<p>
<label for="age">Age:</label>
<input type="text" id="age"/>
</p>

<p>
<input type="button" id="btn_save" value="save"/>
</p>
Then the container for the table:
<div id="container">

</div>
Model
Were not ready to create a new Model which we are going to temporarily store the name and age of the person.
<script>
var people = Backbone.Model.extend({

});
</script>
Inside the people Model is the constructor, this isn’t required but we need to be able to see something when a new people object is created. This is also the best place to put listeners. As the name suggests the listeners are simply used to monitor the value of a certain data in the model.
initialize: function(){

}
Inside the constructor you need to bind the error event. This simply listens to the
this.bind('error');
Next is the defaults or the default attributes and values that you want to add on your Model. These are simply the fields in a table when were comparing it to a database.
defaults:{
	names 	: [], //stores all the names
	ages	: [], //stores all the ages
	name 	: '', //will store the current value of name
	age	: '' //will store the current value of age
}
Next is the validate method. As the name suggests this method is where we put the validation logic for our model. This is where we check for required fields, number-only fields, email addresses, etc. If the idea doesn’t excite you then you might as well use happy.js, html5validate or the jQuery Validation plugin.
In the example below we simply check whether the attributes name and age have values on it and return an error if either of them doesn’t have a value. Remember that when you return a value from the validate method it should always be the error that you’re returning. In other words this is not the place where you check for things that have passed the validation.
validate : function(attributes){
	if(attributes.name == '' || attributes.age == ''){
		return attributes.name + " "  + attributes.age;
	}
}
Lastly instantiate the people model.
var p = new people();
Saving
Next is the code for saving values into the people model. Begin with delegating the click event into the save button.
$('#btn_save').click(function(){

});
Inside the event get the name and age inputted by the user.
var name 	= $.trim($('#name').val());
var age  = $.trim($('#age').val());
Also get the current names and ages that are on the people model.
var cur_names 	= p.get('names'); //array of names
var cur_ages	= p.get('ages'); //array of ages
Then simply set the name and the age. This saves the value of name and age inputted by the user into the name and age attributes in the people model.
var check = p.set({'name': name, 'age': age});
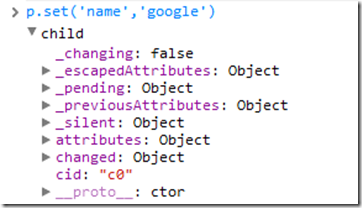
The set method returns a value of false if the value is not saved into the attribute that you have specified and it returns an object when its successfully saved on the attribute that you’re referring to:
If check is a truthy value then the code inside of it will be executed if not then issue an alert to the user that all fields are required. I recommend that you read this article by James Padolsey on truthy and falsey values if you don’t have an idea on what truthy and falsey values are.
if(check){ }else{
alert(‘all fields are required!’);
$('#name, #age').val('');
}
If both the name and the age is inputted by the user we perform the following code.
First push the name and age inputted by the user into the current names and ages. Push() is a built-in method in JavaScript that allows us to push a single item at the end of the array.
cur_names.push(name);
cur_ages.push(age);
Set the value of the names attribute to be equal to the current names. Do the same with the ages attribute.
p.set('names', cur_names);
p.set('ages', cur_ages);
Of course you can also do it this way if you’re in a hurry:
p.set({'names' : cur_names, 'ages' : cur_ages});
Lastly, clear the textboxes:
$('#name, #age').val('');
Table
Next we build the table where were going to append the names and ages of the people that were adding.
First select the body.
var body = document.getElementsByTagName('body')[0];
//select the body tag
You can easily do this in jQuery through something like this:
var body = $('body');
But I’m currently practicing my plain js skills so please bear with me if you see some good old JavaScript in the examples.
Check if the there is no table in the page yet.
if($('table').length == 0){ //create the table }else{
//get the tbody
}
Inside it we create the table headers and table body. (If you have keen eyes you might have noticed that I’ve pretty much forgotten about the thead but it’s not actually required so we’ll be fine)
var tbl = document.createElement('table');
tbl.setAttribute('border' , '1'); //set borders to 1

var tr = document.createElement('tr'); //table row for headers

var th_1 = document.createElement('th'); //header for names
var th_2 = document.createElement('th'); //header for ages

th_1.innerHTML = 'Name'; //header text for header names
th_2.innerHTML = 'Age'; //header text for header ages
//append the headers into the table row
tr.appendChild(th_1);
tr.appendChild(th_2);
tbl.appendChild(tr); //append the table row into the table

var tbody = document.createElement('tbody'); //tbody
If the table is already created we simply select the table and the tbody:
}else{
	var tbl =document.getElementsByTagName('table')[0];
	var tbody= document.getElementsByTagName('tbody')[0];
}
And here’s the code that’s we will be executing everytime a new valid person(with both name and age) is created by the user.
var tr_2 = document.createElement('tr'); //create new table row
var td_1 = document.createElement('td'); //create table definition
var td_2 = document.createElement('td');
//set table definition text
td_1.innerHTML = name;
td_2.innerHTML = age;
//append the table definition into the table row
 tr_2.appendChild(td_1);
tr_2.appendChild(td_2);
tbody.appendChild(tr_2); //append the table row into the tbody
tbl.appendChild(tbody); //append the tbody into the table
body.appendChild(tbl);
Conclusion
Yeah! I guess that’ pretty much all we have to talk about. Be sure to check out the resources I mentioned below if you want to learn more about Backbone.js since I won’t be mentioning it again on the next parts of this series. In this tutorial we’ve created a very simple application using underscore.js, backbone.js and jQuery. As I have said earlier were going to make this application more awesome as we go through the series.
Resources

