Displaying array items on vb.net listbox

I’m currently having a crash course on vb.net. I thought that it would be useful to know the basics of vb.net because we will be converting an existing system which was made through vb.net programming language.
In this short tutorial, I’m going to show you how you can loop through an array and place all the items inside a listbox or a combo box. The final output would look like this:

image

If you’re asking what are those names. I didn’t made them up, they are actually name of the characters from Patapon 3.

Declaring the array
First let’s declare the array. Let’s just declare it globally so that all the methods can access its value:

Dim names() As String = {"taterazay", "pyokorider",

"guardira", "piekron", "myamsar"}


Loop through the array
Then we iterate through the array contents using for loop. We did subtract 1 from the original array length because the call to the names.Length function will actually yield you 5. Which isn’t right because the count starts at 0 and ends with 4. Which totals to 5.

For d = 0 To names.Length - 1
   //populating combo box and list box code will go here

 Next d


Populating combo box and listbox
As you have seen from the screenshot above, the event that will populate the listbox and combo box will only happen if the button has been clicked:

Private Sub Button1_Click(ByVal sender As System.Object, ByVal e As System.EventArgs) Handles Button1.Click

        For d = 0 To names.Length - 1
           
            ListBox1.Items.Add(names(d))
            ComboBox1.Items.Add(names(d))

        Next d
 End Sub

vb.net database connection basics part 2

This is the part 2 of the 2 part article on the basics of vb.net database connectivity. In this guide I’ll show you how the few things which changes whenever you try to connect to different kinds of database.  Here is a link on the part 1 of this series in case you haven’t red it yet.

There are only few things that changes whenever you try to connect to different database:

  1. Connection String
  2. Namespace
  3. Methods used by the namespace
  4. Driver to be used


Connection Strings

According to Wikipedia, a connection string is a string that specifies information  about a data source and the means of connecting to it.

This only means that for every database , there is  unique connection string to be used.

The connection string that were referring here, is the parameter which goes inside the declaration of the database connection in the vb.net application. Here is an example of a connection string which I use in connecting to a mysql database using the MySql ODBC driver.

Dim cn As New OdbcConnection("DSN=yoh")

As you can see, the connection string is the one that is inside the parenthesis which is then enclosed in quotation marks. The connection string here is short compared to the other connection strings, this is because I have used a DSN. Short for Data Source Name. The DSN is used as a reference to all the information which is needed by the program in order to connect to the database. And the DSN is defined somewhere else in the operating system.

If you want to know how to connect mysql and vb.net using ODBC , then check this one out.


Namespace

This is the one which is on uppermost part of the visible code. It is often placed on a Parent Class so that other forms can inherit from it. And there will be no need to re-declare the namespace on every form that you’re going to create.

Here’s a list of namespace that I know:

  • System.Data.Odbc- the.NET Framework Data Provider for ODBC
  • System.Data.SqlClient- the.NET Framework Data Provider for SQL Server
  • System.Data.Oledb- the .NET Framework Data Provider for OLE DB.
  • System.Data.MysqlClient- the .NET Framework Data Provider for MySql DB. Mainly used when connecting mysql to vb.net using the .NET Connector.


Basically you will need to type the keyword ‘imports’ before each namespace. So that the program will know that it’s a namespace that you are declaring. Pretty much like declaring a variable, we typically use the ‘dim’ keyword in vb.net.


Methods used by the namespace

Of course, the namespace will determine the methods which can be used in manipulating the database. The methods that I’m referring here are built-in methods which is contained on every namespace. Because each namespace is like a large library of codes and there are methods in it that  you can use.

I’ll just give few examples here, so that you’ll understand what I’m talking about.

In this example, I’m going to use the ODBC namespace:

Imports System.Data.Odbc

So it is automatic that we’ll also be using odbc in each of the methods that were going to use. For the connection we use:

Dim cn As New OdbcConnection("DSN=yoh")

As you can see, I used OdbConnection in the declartion. That is because I used the ODBC namespace.

When I declare a command, I also do something like this:

Dim cmd As OdbcCommand

If I declare a data reader:

Dim rdr As OdbcDataReader

For those of you who do not know what data reader is. It is a built-in method in vb.net which is mainly used for fetching records or data from any database. So even if you are using a different database, you would still use data reader. But keep in mind that you have to change the word before it when you use a different database. I’m using ODBC as an interface between MySql and Vb.net that is why I declared it as OdbcDataReader.


Here’s the round two of the examples, so that you’ll fully understand how the namespace dictates the name of the methods that were going to use.

If on the other hand I use connector.net to connect vb.net and mysql. Then I make use of this as my namespace:

imports MySql.Data.MySqlClient

Then the connection declaration would be:

Dim con as new MySqlConnection("Server=myServerAddress;Database=myDataBase;Uid=myUsername;Pwd=myPassword;")

It’s a bit longer since I didn’t use a DSN.


Driver to be used

Lastly, we also need to consider the different drivers that we could use to connect our application to a database. Here are some database drivers:

If you already visited the links you will see that most of the drivers are for ODBC. Which means that you can also use a DSN on each of them to make the declaration of the connection string less tiring.

vb.net database connection basics part 1

In this guide, I’m going to show you the things you should know when you want to connect  your vb.net application to a database.

Connecting your application to any database is easy as long as you know the basics. Because almost all of the codes used in connecting to different database are the same. You only have to modify a few lines of code to make it work for you.

The connection strings is one of those that needs to be modified. And you can find a lot of connection strings on connectionstrings.com. They have connection strings for every database that you can think or know of.

This guide is the one that you might want to check out first before trying any of these:

Yeah, that is some sort of a summary of all the things I have discussed regarding database connectivity on vb.net.


Creating a new project

Let’s get to the point. First thing that you’ll need to know is creating a new project in visual studio. If you find this lame, then you can just skip and scroll down until you find what you need. Because I’m doing this for the absolute noob’s sake.

image

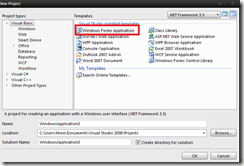
Click on new, and then project, then you’ll see something like this. Just make sure that you have selected the windows form application.  Then press ok.

image


Creating and class

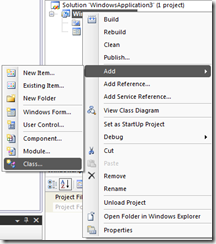
Second thing that you need to know is creating new classes. Because we will be using this new class as a base class for inheriting and using methods that we will use to connect and manipulate the database.

image


Declaring an object of a class

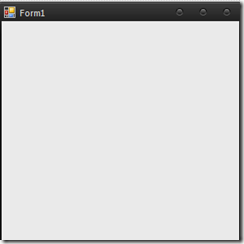
Next thing that you’ll gonna need to know is how to declare an object of the newly created class in your windows forms (the one with the graphical user interface, or an empty canvas). Just to be sure, I’m referring to this one:

image

To declare an object of the class in this form, just double click it so that you’ll see its source code.

Then you type this line of code, just below the public class form1.

Dim c1 As New Class1

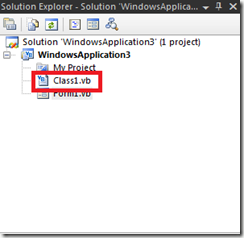
Of course the ‘Class1’ here can vary. Depending on what you have named your class. Good news though, you can see what’s your class name on the solution explorer.

image


Creating subroutines

Fourth thing that I want to explain to you is how you can create subroutines. This is important since were going to use subroutines or subs for querying the database. And its more convenient using subs so you wont be copy pasting the code all over when you need something that needs to be repeated.

Just go back to the class, and type this one:

Public Sub insert_records()
 
End Sub

The whole code will now look like this:

image

That’s how to create a sub. And what you’ll be putting inside those subs are individual queries like inserting, updating, and deleting records from the database. Each sub will have different functions and parameters. But there can only be one function that each one performs so that it won’t become confusing.


Creating functions

Functions are different from subs, since subs only perform an action. A function on the other hand, performs an action and then returns a value to the one who is calling it.

I often use functions on reading data from a database using the built in data reader. Here’s an example of a function which reads data from a database. It uses mysql stored procedures that’s why the code is a bit different.

Public Function readfrom_drug_type_table() As MySqlDataReader
       Try
           cmd.CommandText = "CALL readfrom_drug_type_table"
       Catch
           MsgBox("Reader is opened close it first by clicking on the close link")
 
       End Try
       Return cmd.ExecuteReader
 
 
End Function

Always remember that when you’re creating functions you must always have a return value. You will get an error if you don’t have it. In the example, the return value is ‘cmd.executeReader’.


Calling subroutines

I often call subroutines from windows forms. And to call subroutines, you must have an object of the class where the subroutine is declared. And the subroutine should also be public so that any class can access it. Scroll up if you have forgotten how to create an object of a class. If you remembered, the name of the object I declared at the top is ‘c1’ referencing the class named ‘class1’. To call the subroutine ‘insert_records’ from the form load event you’ll just have to double-click on the form that you wish to be called it from then type this line of code.

c1.insert_records()

Make the necessary changes if your object is not called ‘c1’ and your subroutine is not called ‘insert_records’


Conclusion

That’s it for part1, I hope you learned something. And please share this post using the facebook share buttons and stumbleupon buttons below. ThanksSmile

How to use mysql stored procedures in vb.net

In this tutorial, I will show you how you can convert your bare sql statements that is hard-coded in your vb.net application into stored procedure calls.

When I say hard-coded sql statements, it means that the sql queries used to create, update, delete, or view records in your database is in the application itself.


Advantages

  • Faster data retrieval- although there won’t be much speed you will get if you are only fetching from a database with barely 2-3 tables. And not using table joins. And also if your tables has only about a hundred records, you wont notice much difference in speed.
  • Portability- your sql queries are stored in the database itself, so you don’t have to worry about database manipulation if ever your application is not with you.
  • Security- because if anyone tries to peak at your applications source code, they will only see stored procedure calls, instead of sql queries.


Requirements

  • WAMP Server
  • Heidi SQL (Portable or installer version will do, but I prefer the portable version)
  • Visual Studio 2005 or later

After downloading and installing the requirements above, your now ready to create stored procedures. Please create a database, and a table within it if you don’t already have one. You can create them on either Heidi SQL or in phpmyadmin.

After doing that, open up heidi sql then input your password if you have one. Then click ‘open’.

image

What you’ll have to do now, is to select your desired database, then select your table. Right click it, select ‘create new’ then  click on ‘stored routine’.

The first thing that you’ll gonna need to do after that, is to put a routing name, I put ‘creates’ but you can put whichever you like:

image

After that, you might want to check the fields that are in your table. To do that, just right click on your table then select ‘edit’. You will then see something like this:

image

What you’ll want to do now is to create names which are similar to the fields in your table. For example, if you have ‘PRODUCT’ field, you might want to change that to ‘prods’. And that name, ‘prods’ will be used as a parameter name. You have to change it because the stored routing may treat your parameter as the field name if you don’t do so.

If you are like me, and you didn’t save the stored routine a while ago. You may want to repeat the procedure. Just right click on the table, select ‘create new’ then click on stored routine. Enter the name of the stored routine, then click on the ‘parameters’ tab.

Remember, just add the names that are similar to those of the field names, and put the same data type of the field you are basing it to:

image

The context is ‘IN’. Because this stored procedure that we are creating is for creating new records. So ‘IN’ means that the data is going to come from the user and not from the database.

You may want to go back to the ‘options tab’ to put the actual code:

INSERT INTO prod_table(PRODUCT, P_DESC, CATEGORY, TOTAL_QTY, QTYHAND,  REORDER_LVL, LIST_PRICE) 
VALUES(prods, descr, cats, tqty, qty, reorder, price);

You have to place the code above, inside the BEGIN and END tags. After that, click on ‘save’ then try to ‘run the routine’.

If all goes well, you should now have a stored routine that can create new records.

Wew, that’s just part 1 of the whole story. Part 2 will be the actual calling of the stored routine from your vb.net application.

So open up visual studio, and create something like this:

image

This is just an example made  for beginners, if you already have your application set then just scroll down to your point of interest.

If you don’t have a parent class in which you can inherit methods. Then create one. Just right click on ‘Windows application 1’ then select ‘add’ then click on ‘class’. Name the class whichever you want then put

imports mysql.data.mysqlclient

as your namespace, if you don’t know what namespace does. For a quick tip, its used to access the methods needed to manipulate the mysql database server.

If you don’t know how to connect mysql and vb.net, I’ve made a guide here.

Now, in your parent class, create a method that will create a new record. Then place this code in that method:

cmd.CommandText = "call creates('" + prods + "','" + descr + "','" + cats + "','" + total + "','" + qtyonhand + "','" + reorder + "','" + lprice + "')"
        
cmd.ExecuteNonQuery()

What the code above does is to call the stored routine ‘creates’. And supplies the necessary data to be included.

In your main form. You can just do something like this inside the event ‘button click’ to call the method ‘creates’ from the parent class that you have created:

     p.prods = TextBox1.Text
     p.descr = TextBox2.Text
     p.cats = TextBox3.Text
     p.total = TextBox4.Text
     p.qtyonhand = TextBox5.Text
     p.reorder = TextBox6.Text
     p.lprice = TextBox7.Text
 
     p.creates()
 

That’s it, if you want stored procedures for update or delete. You can do the same, just change the queries to your liking.

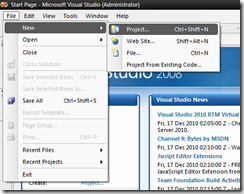
Connecting vb.net to ms sql server 2005

In this tutorial, I’m going to show you how to connect your vb.net application to microsoft sql server 2005.

Requirements:

After downloading and installing the requirements on your computer, the first thing that you have to do is to create a sample application, launch visual studio and create something like this:

image

If you just want to know how to connect, then scroll down to your point of interest.

After that, open up Microsoft SQL Server Management Studio, and you’ll see something like this:

image

The server type must be set to database engine.

The server name must be set to the name of your computer then forward slash, then the kind of server. In this case, I’m using SQL Express.

If you have password on your computer, then you should place it also.

If you don’t know the name of your computer. Just click on the start orb then right-click on my computer. Then select properties.

After that, scroll down a bit and you’ll see something like this:

image

In my case, the computer name is Vongola. So you just have to change that to all caps. Like the one you saw above.

I’m using Windows 7. So it might be a little bit different if you’re using Windows XP. It should be the same if you’re using Vista.

If everything goes well, you’ll be seeing something like this:

image

First thing that you’ll need to do in here, is to create a new database.

To do that, just right click on Database then select ‘new database’. Just supply the database name that you want then click ok.

After that, you should now be able to see your newly created database on the left-hand pane:

image

I named mine to ‘testdb’. You should see a different name depending on what you have typed earlier.

Then you have to add some tables on your database. To do that, just expand ‘testdb’. Then you’ll see ‘tables’. Right click on that and select ‘new table’. Add the necessary fields. Then press ctrl+s on your keyboard. Name the new table to whatever name you want then click ok.

image

Back to visual studio, what you’ll want to do next is to add a new class for inheriting methods that we will be using to extract and use data from the ms sql database. To do that, just right click on ‘windows application 1 in the right-hand pane’. Then select ‘add’ then click on ‘class’.

image

Then put the code that you see below, in the newly created class:

image

Then put this on your main form(the one with the GUI):

Public Class Form1
    Dim p As New parent
 
    Private Sub Button1_Click(ByVal sender As System.Object, ByVal e As System.EventArgs) Handles Button1.Click
        p.name = TextBox1.Text
        p.course = TextBox2.Text
        p.creates()
 
    End Sub
End Class

You will get the connection string for sql server 2005 from here.  You’ll need a different connection string for every kind of database that you wish to connect your vb.net app to. But the process and the code used to manipulate different kinds of database is almost always the same.

I’ve already included comments in the code, to show you what  those codes do.

Connecting vb.net to mysql using mysql connector.net

There are many ways on how to connect mysql and a vb.net application. But in this tutorial, I will show you how you can connect your vb.net application to a mysql database using connector.net.

Requirements;

After downloading and installing the requirements. First you need to make a sample project. Like this one:

image

If you remember my tutorial on ms sql connecting to vb.net, I used the same project. So if you have a copy of that, then make use of it.

Now, go to the parent class. Then click on ‘project’ then ‘add reference’, then select ‘mysql data’:

image

Note: You have to install connector.net first, before you can actually see that mysql.data is in there.

image

Now, you’ll need to go to connectionstrings.com, and find the connection string for mysql.

There are few things that you need to change in the connection string:

Server– this is the name of the mysql server. Usually its called ‘localhost’, if you haven’t edited the default values when you installed wampserver.

Database- this is the actual database that you’re going to manipulate. You can create it by going to http://localhost/phpmyadmin/. But launch wampserver first.

UID- short for user id. This is the username of the one manipulating the database. Again, if you haven’t messed with the installation, and leave those values to its defaults. Then your username should be ‘root’

Password- by default there is no user password. Unless you’ve put it using phpmyadmin.

That’s it, as I have said on my previous post regarding ms sql server. The codes are almost always the same, only the connection string and the namespace changes. If I haven’t mentioned the namespace that you’re gonna be using, this is the complete namespace:

imports Mysql.Data.MysqlClient

And you also have to change the rest. If you have followed my tutorial on ms sql. Then you have to change.

sqlcommand to mysqlcommand, sqlconnection to mysqlconnection, and so on.

Something like this, if I haven’t made my self clear:

Dim con As New MySqlConnection("Server=localhost;Database=testdb;Uid=root;Pwd=;")
 
Dim cmd As New MySqlCommand

Then you’ll just have to add something like this on your main windows form (the one that is seen by the user )

image

Don’t forget to inherit from the parent class where all the methods for data manipulation are stored.

That’s all you have to know about mysql connection for beginners.

How to connect ms access and vb.net using odbc

Lets get started, first thing that you need to do is to download and install the requirements below. If you already have it installed then scroll down a little bit.

Requirements:

  • MS Access 2003 or later(In this tutorial, I’ll be using MS Access 2010)
  • Visual Studio 2008 or later

If you don’t already have an ms access database created, then create one. You will see something like this when you open up ms access 2010:

image

What you’ll want to do here is to create a new database and add a table on it.

After creating your new database, just head to ‘table 1’ right click it then select ‘design view’.

image

Input the necessary fields that you would want. If you don’t want an auto number(usually this is the primary key). Then delete it.

Press ‘ctrl+s’ on your keyboard. Then input the table name that you want.

Now, click on start orb. Then ‘control panel’. Select ‘administrative tools’ then click on ‘data sources’. ODBC means Open Database Connectivity. In case you’re wondering. It’s the built in function in windows operating system that allows you to open database connection for almost any database that you know. You can also use this method if you want to connect to mysql database.

Select, ‘MS Access database, from the list of database that is already listed. And you will see something like this:

image

You then would want to select the database that you created a while ago. Just go to the ‘database portion’ then click on ‘select’.

The next part is just easy. Just try to find where you have save your database. Usually comes with the file extension .mdb for database created using ms access 2003. And .accdb, for those that are created using ms access 2007 or 2010.

image

Mine is in:

C:\Users\Wern\Documents

After you’ve gotten a similar window to that of my screenshot. Select the database. In my case its ‘Database1.accdb’. Then click ‘ok’.

Remember: close the ms access windows before trying to click ‘ok’ because you will get an invalid directory error if you don’t.

If everything is clear on that, go to your vb.net application. Then add a new class. Where we will inherit the methods needed for manipulating the database. This is to separate the application logic from the interface partially. And to make the application more object-oriented.

If you don’t know how to add a class, just search for it on google.

As I’m always saying, if you connect to different database using vb.net.  The code is almost always the same, the only thing that is changing is the:

  • namespace
  • connection string

I used odbc to connect so the name space will be:

Imports System.Data.Odbc

And for the connection string parameters, you can use the dsn name that you supplied earlier.

As a shortcut, you can always use the DSN or the data source name as a parameter for the connection string. I named mine ‘yoh’ from the shaman king character ‘yoh asakura’.

image

Here’s the full code, in the parent class where you will be inheriting:

Imports System.Data.Odbc
 

    Dim con As New OdbcConnection("DSN=yoh;")
 
    Dim cmd As New OdbcCommand
 
    Public neym As String
 
    Public Sub New()
        con.Open()
 
        cmd.Connection = con
        cmd.CommandText = "SELECT * FROM table1"
 
    End Sub
 
    Public Sub creates()
        cmd.CommandText = "INSERT INTO table1(Neyms) VALUES('" + neym + "')"
        cmd.ExecuteNonQuery()
 
    End Sub
 

Now, lets try to break the code down. So that you’ll understand what every line of code does.

This is the declaration of the class, its automatically generated code so you don’t have to type it. Its generated when you create a new class in visual studio:

Public Class Class1 

This is the declaration of our connection string. This is the one who is responsible for connecting to the ms access database through odbc. Without it, everything won’t work. Of course, the DSN equivalent here is ‘yoh’ and it may vary depending on what you have declared in control panel.

Dim con As New OdbcConnection("DSN=yoh;")

This is the declaration of command string. Used for executing sql queries in your application:

Dim cmd As New OdbcCommand

This one is just the declaration of the string that you’ll be using to represent the data which you want to enter or retrieve from the database. Always remember that it should be a public string. That is if you don’t need calculations. If you need calculations use the proper data type like int or float or double. It should always be public so that the other class can access it. When I say other class, I’m referring to the other windows form that you have in your project.

Public neym As String

This is the constructor for the class. It instantiates the connection by opening it. And sets the connection that will be used by the command. Then sets an initial query to the database to select all the records from table1. You don’t have freedom to change the name of the subroutine, it should always be ‘new’ since it signifies that it’s a constructor.

Public Sub New() 
       con.Open()
 
       cmd.Connection = con 
       cmd.CommandText = "SELECT * FROM table1"
 
End Sub

Lastly, our sample query. Which is enclosed in a subroutine. Again it should be public so that it can be called from any other class in your project. What were doing here is to insert a new record into our database and set the value to be equal to the strings that we declared a while ago. Then cmd.executeNonQuery, just executes the cmd.commandText.

Public Sub creates() 
       cmd.CommandText = "INSERT INTO table1(Neyms) VALUES('" + neym + "')" 
       cmd.ExecuteNonQuery()
 
End Sub


Conclusion

There are other methods in connecting ms access with vb.net and I’m going to show it later if I have the time. But this one, is the easiest. Because the other methods require more parameters on the connection string.

How to connect ms access with vb.net using OLEDB

The last time, I showed you how to connect ms access and vb.net using ODBC. This time we will use OLEDB to connect the two.

The procedure is similar, so you may want to check this for a more complete tutorial.

I supposed you still have the files from the previous tutorial. So I’m going straight to the point.

What needs to be changed is the connection string and the name space.

The namespace this time is:

imports system.data.oledb

The connection string will be:

Provider=Microsoft.ACE.OLEDB.12.0;Data Source=C:UsersWernDocumentsDatabase1.accdb;

Remember to change the data source to the actual path where your database is. Followed by the filename of your database. You can use either .mdb or .accdb for this.

Finally, change all the odbc that you see to oledb.

The whole of your code in your parent class will look something like this:

Imports System.Data.OleDb
 
Public Class Class1
    Dim con As New OleDbConnection("Provider=Microsoft.ACE.OLEDB.12.0;Data Source=C:UsersWernDocumentsDatabase1.accdb;")
 
    Dim cmd As New OleDbCommand
 
    Public neym As String
 
    Public Sub New()
        con.Open()
 
        cmd.Connection = con
        cmd.CommandText = "SELECT * FROM table1"
 
    End Sub
 
    Public Sub creates()
        cmd.CommandText = "INSERT INTO table1(Neyms) VALUES('" + neym + "')"
        cmd.ExecuteNonQuery()
 
    End Sub
End Class

That’s it, don’t forget to declare an object of the parent class that you created on your main form:

dim parent as new class1

Where class1 is the name of the class, and parent is the object name that you want. You can change it to whichever you want. But the class name always depends to what class name you have inputted a while ago.

vb.net instant site search

I’m not really sure if there are other options in bringing instant search to sites like wikipedia, bing, yahoo, ask. Or any other sites which offers search functionality. But this is the thing that I know so here I am sharing it to you:

image

The screenshot above is a screenshot of an application made using visual studio 2008. Using the language vb.net.

As you can see there aren’t any buttons which the user can press in order to search on something.

The program is using the text change event in vb.net wherein every key press in the keyboard fires up an event which then executes the search.

I’m feeling good so I’m gonna show you the code, but not all of it.

This is the most important:

Private Sub refreshBrowser()
       Dim _search As String
       Try
           _search = Trim(TextBox2.Text)
           If RadioButton1.Checked = True Then
               WebBrowser1.Navigate(New System.Uri(" http://www.google.com/search?q=" + _search))
           ElseIf RadioButton2.Checked = True Then
               WebBrowser1.Navigate(New System.Uri(" http://en.wikipedia.org/wiki/" + _search))
           End If
 
       Catch ex As Exception
                  Finally
                End Try
End Sub

It’s the subroutine/method that is being called everytime a textchange event is fired up. As you can see I only added search functionality for google and wikipedia. But it is my bad, since google doesn’t need this functionality anymore because instant-search is already integrated on their site. So only the wikipedia is useful here. Since they don’t have instant-search yet.

If you’re wondering, what’s the meaning of this string:

http://www.google.com/search?q="

Then try to paste it on your browsers address bar. And then add a random search query like ‘dog’:

http://www.google.com/search?q=dog

Press enter and see what happens.

That specific string is called the query string. I won’t delve much further on what query string is, so be sure to search for it on google:

http://www.google.com/search?q=query string

You might already know what happens next, but I’m going to tell it anyway.

I added the text in the textbox to that query string to produce a result.

But as you notice, I wrap it in a built-in method called ‘trim’ which trims or remove leading and trailing whitespaces on the text, just to make sure its not searching a blank space.

How to fetch mysql data in vb.net using data grid view

In this tutorial, I’ll be showing you how you can list data from mysql database in a datagridview control in vb.net.


Requirements

  • Visual Studio 2008 or 2010
  • Wampserver

First thing that you’ll need to do is to create a new project in visual studio.

image

Then select the dataGridView control and drag it to your form

image

Then create a label and a textbox. I won’t use any buttons here because I’ll make use of the text_changed event. This will trigger an event that would cause our application to fetch data from the database whenever the text which is in the textbox changes.

image

What we have to do now is to create a class where we would store all the subroutines needed to connect to the database.

image

Name the class whatever you want as long as it ends with a .vb extension

image

We will be using odbc driver to connect this application to the mysql database. So if you don’t know how to do that, then check this out first.

I won’t include the usual routine of declaring connections and commands in this guide so you read this tutorial if you want to know how the usual routine is done.

Before you continue reading, make sure that you have already declared the connection string so that you can connect to the mysql database.

Now, you need to declare a subroutine which we will use to fetch data from the mysql database. Place these codes on the subroutine:

Try

	cmd.CommandText = "SELECT * FROM testdb WHERE name='" & name & "'"
	Me.dataAdapter = New OdbcDataAdapter(cmd.CommandText, con)

	Dim commandBuilder As New OdbcCommandBuilder(Me.dataAdapter)
	Dim table As New DataTable()

	table.Locale = System.Globalization.CultureInfo.InvariantCulture

	Me.dataAdapter.Fill(table)

	Form1.BindingSource1.DataSource = table

	Dim data As New DataSet()

	data.Locale = System.Globalization.CultureInfo.InvariantCulture

	Form1.DataGridView1.DataSource = Form1.BindingSource1

Catch

	MsgBox("Something went wrong..")
	
End Try

As you can see, we enclosed the codes in a try-catch so that it would not cause a yellow-ribbon if ever there’s an unexpected error.

There would be some errors and warnings that visual studio will throw at you when you paste the code above into the subroutine. Because there’s still some housekeeping that you need to do.

First, you need to  make sure that the variable name for the command is the same with the cmd in here. If the variable name for the command is different. Then make sure that they’re the same. The following codes will just point out what you need to change, you don’t need to copy them.

Dim cmd As OdbcCommand

cmd.CommandText = "SELECT * FROM testdb WHERE name='" & name & "'"

Then declare a data Adapter just after the declaration of the class. You don’t need to copy the class declaration, I only used it to point out that the declaration of the dataAdapter should come after the class.

public class parentClass
Private dataAdapter As New OdbcDataAdapter()

Then go to your form designer. The form where you have the datagridview and drag a binding source control.

image

Back to the parent class again. Make sure that every Form1 declaration that you see would be the change to the name of the form where the dataGridView is. Here are some that I have found, which needs to be change. If the name of the form where you have the dataGridView is form1 then there’s no need to change these lines of code.

Form1.BindingSource1.DataSource = table
Form1.DataGridView1.DataSource = Form1.BindingSource1

Now, here’s an optional code,which you might want to add. This will auto-resize the columns in the dataGridView so that it would fit the actual size of the dataGridView.

Form1.DataGridView1.AlternatingRowsDefaultCellStyle.BackColor = Color.White
Form1.DataGridView1.AutoResizeColumns( _

DataGridViewAutoSizeColumnsMode.AllCells)

I think that’s all that you need to change.

This is what it will look like when you first run it

image

But when you type something on the textbox. It fires an event which causes the subroutine from the parent class to be executed.

image


Conclusion

That’s how you fetch data from the mysql database and throw it to the dataGridView form control in vb.net. Hope you learned something. If there’s something that you don’t understand then tell it on the comments. Thanks for reading.